Blogger Widgets

10/13/12

Nookie Lookie: Cool Spaces - The Nook

Window Nook
 
I, like all of you no doubt, am a Pinterest addict.  Every chance I get, I am trolling for DIY projects, cool tips and tricks, and especially random visual stimulation.  Today I was feeling a little nookish, so I thought I'd share some fabulous nook decor inspiration. 

Book Nook
 
Closet Nook


Bedroom Nook
 
 
Under Stairs Nook
 
 
Window Seat Nook
 
 
Attic Nook


Beautiful Nook For Her
 
Kinda makes you want to re-evaluate all the unused space in your house.  Hell, I use my closet for traditional purposes.  Do you think Mr. Martnii would be crabby if I turned it into a little lady sanctuary ala nook?  Hmmmm....


10/12/12

Brining Your Way to the Perfect Moist Thanksgiving Turkey


Thanksgiving, Roast Turkey
Perfect Roasted Turkey
 

I grew up in a house that did not specialize in roasted turkey.  In fact, I didn't even know turkey could taste like something other than styrofoam until I was in my late twenties.  Rather, it was one of those obligatory must-have holiday food-stuffs, a single serving of which held you over until the next year.  Sorry Grandma Martini, you know it's true.

Then I had to create a Thanksgiving dinner for my own family, and I really, really didn't want Mr. Martini to think I had no idea what I was doing.  Enter: The Brined Turkey.  I was totally afraid of brining, as may people are.  I mean, how can you soak a piece of meat in water that would literally kill a person if they drank it, and end up with something tasty?  It defies logic.  But I assure you, this recipe makes far and away the best turkey I have ever had.  Perfectly tender, moist and delicious.   It is truly worth all the effort.  Do not fear all the salt, the bird will not absorb it. You will not be left with an over salted bird, I promise.

LET'S GET COOKING!!!

14-16 lbs. turkey, thawed if frozen

Brine:
5 gallon unused and cleaned bucket (I used a 5 gallon bucket purchased at Menards)
1 cup kosher salt
1/2 cup brown sugar
1 gallon vegetable (or chicken) stock
1 1/2 tsp allspice berries
1 gallon heavily iced water
2 lemons, sliced in half
4 bay leaves

Aromatics:
1 red apple, sliced
1/2 onion, sliced
1 cup water

Turkey Cavity:
4 sprigs rosemary
6 sage leaves
vegetable oil

On the day before roasting:
Bring salt, brown sugar, stock, and allspice berries to a boil, just to dissolve the sugar and salt. Let it cool. Combine brine, water and ice in the 5 gallon bucket and place your turkey with inerds removed, breast side down in brine. If necessary, weigh down the bird to ensure it remains fully immersed (I didn't need to, but a brick covered in tinfoil stuffed in a water-tight plastic bag would do the trick). Cover and refrigerate (or stick in the garage if you live in the tundra) for 8-16 hours (the longer, the better). Turn bird once half way through brining.

The day of roasting:
Preheat oven to 500 degrees.  I know, insane right?  There is a method to the madness.  Cranking up the heat gives the skin time to get all toasty.  You turn the heat down after 30 minutes.

Remove bird from brine, and rinse inside and out with cold water. Place your bird on a roasting rack in a roasting pan. Combine aromatic ingredients in a microwave safe bowl. Microwave on high for 5 minutes. Add steeped aromatics to the turkey's cavity along with sage and rosemary. Tuck wings underneath the bird and coat skin with oil. You can truss the legs if you are so inclined.

Roast turkey at 500 degrees for 30 minutes. Reduce oven temperature to 350 degrees and roast for about 2-2 1/2 hours, or until a thermometer stuck in the thickest part of the breast reads 151 degrees. Let turkey rest loosely covered with foil for at least 15 minutes before carving.

**You may also want to build a breast plate (i.e. tinfoil armor for your bird that covers the breast but leaves the legs exposed) when you change the temp. from 500 to 350. This will ensure the breast doesn't get too browned.  If you feel like your bird isn't browning enough after about 1 1/2 hours in, remove your breast plate and baste with 7-up.  The sugars in the 7-up carmelize on the skin and give it the little push it needs to get all Florida retiree brown.

10/11/12

How R2D2 Changed My Life

Here in the Monkey House, we like Star Wars.  Actually, we're kind of obsessed.  And it all started during the brief whirlwind of a courtship between Mr. Martini and me.  One night after some, umm, imbibing, Mr. Martini opened the closet and seemingly out of thin air came five full replica light sabers.  The kind that could be a movie prop if you didn't know better.  At the time, I couldn't have cared less about Star Wars.  That was until my first 2am parking lot light saber battle with the neighbors.  I was intrigued.


My intrigue turned to shock when I learned that the handsome, refined, debonair Mr. Martini was in fact the world's biggest Star Wars geek.  Upon moving in, I realized that most of the closet space in the apartment was filled with bin upon bin of unopened Star Wars figures, ranging from vintage to brand spanking new.  This was not a passing casual interest. Oh no, this was a full on addiction.  And apparently that is also a genetic trait passed from father to son in some weird Star Wars transferal during conception.


As Silly Monkey grew older, his addiction grew too.   Mr. Martini and our son became full on Star Wars junkies.  They would go to the toy store and ogle over the figures they **I said THEY** didn't have.  Mr. Martini would present a new Star Wars toy for the slightest act of good behavior, including throwing a snotty tissue away, drinking milk, or just standing up.  My son would tell his teachers that he was not the droid they were looking for. And of course, they both mastered the art of using the force to open the entrance doors at Target.  It was inescapable. Star Wars was everywhere. Star Wars was everything.

So it came as no surprise when Silly Monkey said he wanted to be R2D2 for Halloween.  And of course there was not a single R2D2 costume in the galaxy that would fit this 3 year old junkie.  So being the enabler that I am, I decided to make one.  It took days, several trips to Office Depot, the hardware store, lots of glue, some power tools, and at least one phone call to the police as another mom at the store watched me gently place my son in a trash can to see if he fit. As if I was making some kind of sick Silly Monkey casket.  Dumbass. 

But the result was quite spectacular, if I do say so myself. 


That R2D2 became a trusted friend after Halloween.  My son would wear him almost daily until the point when he could no longer comfortably
fit into it.  Then R2D2 became more of a side-kick, taking his place in Silly Monkey's room, defending against Tuscan Raiders and such.  The evidence of love became visible as R2's ribbon spool arms fell off, as did his foam core legs.  Soon, the decals that made him so identifiably R2 got rubbed off, torn, or washed off.  After all, as any loving daddy droid would do, Silly Monkey tried to give his little life size R2D2 a bath.

We still have R2D2, and he is a well loved friend.  All the paint is chipped off and there are big, long, sad strings of hot glue marking where his limbs once were.  His head falls off regularly, and he has a smell somewhere between locker room and crayon box.  Silly Monkey will keep this abomination until he is in college I have no doubt, and with that I am fine.  But we do  keep the blinds closed when Silly Monkey takes him out of the closet, because now, when he squeezes himself into his former costume, he really is nothing but a large boy stuffed in a small trash can.  And what would the neighbors think about that?

This article:


10/9/12

How to Make Low(er) Carb Eggs Benedict

Low(er) Carb Eggs Benedict Crepes!
Breakfast recipes, Crepes, Eggs Benedict
Eggs Benedict Crepes
Mr. Martini and I feign a low-carb "lifestyle".  I say "lifestyle, because it really is more than just chucking pasta and bread, and I say feign because I have been eating pasta and bread everyday for about three months.  Hey, I'm knocked-up again, and that stuff is like starchy diamonds to a pregnant chick. 
 
In any case, because it is a lifestyle, I try to lower our carb consumption when cooking.  And because I am a mom of two with one on the way, I try to dress up our inevitable leftovers whenever I can.  Over the weekend I scored big on both fronts with these yummy, super pretty,
Eggs Benedict Crepes stuffed with leftover Tarragon Chicken.
 
SHOPPING LIST:
2 Boneless Chicken Breasts (Leftovers work great!!)
1/4 cup yellow onion, chopped
1 tsp (or so) Dried Tarragon 
6 Eggs
1 stick, plus 3 TBS Butter
1 Cup Flour
1/2 Cup Milk
1/4 tsp Salt
1 TBSP 9or so) Lemon Juice
3 TBS White Vinegar
Oil (for crepes... non-stick makes it unnecessary)
 
LETS GET COOKING!!
 
CREPES:
In a large mixing bowl, whisk together 1 cup flour and 2 eggs. Gradually add in 1/2 cup milk and 1/2 cup water, stirring to combine. Add the salt and butter; beat until smooth.

Heat a lightly oiled griddle or frying pan over medium high heat. Pour or scoop the batter onto the griddle, using approximately 1/4 cup for each crepe. Tilt the pan with a circular motion so that the batter coats the surface evenly. You want it to just barely coat the pan.

Cook the crepe for about 2 minutes, until the bottom is light brown. Loosen with a spatula, turn and cook the other side. Stack each crepe on top of each other between sheets of waxed paper so they don't stick together.  Move on.

CHICKEN:
Since I used leftovers, I just chopped the chicken into small pieces.  The smaller the better, since the crepes are delicate and may tear if you wrap them over giant chunks. If you don't have leftovers, saute your chicken breasts with some salt and pepper until fully cooked.  Cool until you can handle them, and chop 'em up.

Saute finely diced onion in a 1 TBSP butter until transparent.  Add Chicken and Dried Tarragon.  Feel free to add a splash of lemon juice if you wish (I think you get enough of a lemony kick with the Hollandaise, but whatever floats your boat ;)  Cook until just warmed up and yummy smelling.

MEANWHILE: bring water in a high-sided sauce pan to a simmer for the poaching of the eggs.  Add about 3 TBS vinegar (this will keep your poached eggs neat and pretty).

HOLLANDAISE SAUCE:
So many recipes say to use a double boiler.  I think, unless you think everything cooks better on high and thus you tend to have to scrape most of your dinners off the bottom of the pan, you should be fine without it.  I set my stove to about 3 (medium-low?).
In a smallish sauce-pan set on medium-low, whisk 2 eggs and 1 TBSP lemon juice like you are in a whisking competition. Once combined thoroughly, add 1/4 cup firm butter, and stir constantly until the butter is just about melted.  It should take a little while, you don't want your butter to melt super quick.  Low and slow to cook the eggs.  Add the remaining 1/4 firm butter, and continue stirring.  Now as the butter melts, the sauce should begin to thicken up. Double check your lemony-ness, and if you prefer a bit more pucker, add a bit more juice.  When thickened, take it off the heat.  Voila!
**If you happen to heat it too quickly and the sauce separates, add about a TBS of warm water and whisk like your a human whisking machine.  This should help re-bind the sauce.

PUT IT ALL TOGETHER AND WHAT DO YOU GET?
Put about 3-4 TBS chicken mix in a crepe and roll up. Top with your poached eggs, and
drizzle Hollandaise Sauce on top. I fancy-it-up with a shake of paprika and a little parsley, but that is almost entirely for visual interest and can be skipped in a pinch.

How low carb you say:  I got about 10 crepes out of the batter, and the batter has about 94.5 carbs total, so you're looking at about 9.4 carbs per crepe.  The chicken filling has minimal carbs (I'm not a big fan of counting veggie carbs... there's too many good things about them to be concerned with it) and the sauce and eggs have none.  So, not too shabby ;)  And really, who the hell cares?  These babies are too delicious to fret about it. 


10/8/12

How to Get Rid of Fruit Flies and Gnats Naturally

get rid of fruit flies or gnats
Gross but effective fruit-fly catcher
 
Gross! So I'm trying to sell my house and the number one thing you DON'T want to see in a house you plan to buy is a swarm of fruit flies hanging out in the kitchen.  My monkeys love bananas (I can't even say it without thinking Gwen Stefani: this shit is bananas, b-a-n-a-n-a-s).  But that means we are prime targets for these pesky little bastards.
 
Until now!  I found a solution that actually works at getting rid of them. It's cheap and easy, and it works outdoors if you have potted plants and the gnats that may sometimes swarm them too.
 
Small bowl or Ramekin
Apple Cider Vinegar
Dish Soap
A Splash of Water
 
Add vinegar and about a 1/2tsp of dish soap to your vessel.  put a splash of water in to create bubbles.
 
The little rat bellies are attracted to the vinegar and then get stuck and drown when they try to hop on the bubbles to drink up.  Change it every day or so and you will soon have a gnat-free kitchen.
 
Who Knew?


"What To Do With All This Damn Leftover Turkey" BBQ


leftover turkey, leftover turkey recipes, leftover turkey BBQ
"What to do with all this damn turkey" BBQ


This post is another original from Grandma Martini (aka Empress of the Universe).  I LOVE ideas about what to do with leftovers, especially when you can plan on having about a billion pounds of cut up meat with no plans how to consume it.  Enter: super quick and easy day-after Thanksgiving BBQ!

Direct from the Empress' finger tips:

This year marked the 31st time I’ve prepared Thanksgiving dinner. There have been a couple years here and there when I wasn’t cooking, due to general malaise or whatever. And one year we had Thanksgiving at my daughter’s, which was delightful. The festivities included the fried turkey experiment, which made a memory I cherish to this day.
*Thanks mom... at least I had the balls to try ;)
 
Ever try to deep-fry a turkey when it’s 20 degrees outside? Not pretty, people: you have a driveway full of men flapping their arms to keep warm while the oil never rises above 200 degrees and women in the kitchen waiting for the sounds of explosions and fire trucks. But I digress.
 
I’ve learned that Thanksgiving leftovers, like in-laws, lose their charm after 3 or 4 days, no matter how creatively you attempt to disguise them. And despite my annual pleas, Mr. Wonderful continues to insist that his 25-pound poultry is not too big for four people. So I know a little something about leftovers.
 
Which brings me to this morning. I decided to turn my leftover cranberry sauce (which everyone demands but nobody really eats) into barbecue sauce. I’ll simmer a some turkey in it when I get home from work, slice it up and shovel it into tortillas with some onions and avocado. So here’s the sauce:

SHOPPING LIST:
1 cup cranberry sauce (the whole berry kind is best, but got ahead and use that canned abomination)
1 15 oz. can tomato sauce
1 TBS Cumin
1 TBS Chile powder
1/2 tsp Adobo powder
1/2 tsp. Chipotle powder
2 TBS Chopped Fresh Cilantro
1/4 Diced Yellow onion
1 TBS Worcestershire sauce

LET'S GET COOKING!!
 
Simmer all ingredients in a small saucepan for about 3 minutes, let cool and refrigerate until use.
NOTE: I have a heavy hand with spices—you may want to start with half my measurements and work your way up. Cayenne is also good, but Mr. Martini  believes I’m attempting manslaughter whenever I use it. Apparently in his boyhood Irish/German household, pepper was the cutting edge spice. So you go right ahead and add some cayenne--I just don't want to get the lawyers involved.
Let me know if you like it!
 

Empress of the Universe Homemade Bread


How to make homemade bread
Homemade Empress of the Universe Bread


This recipe comes from my mom. There are a few things she makes that simply are 5 star quality... her baked goods being a category of goodness all to itself. The following quote is from her:

"There's no magic, but years of experimentation have taught her some techniques that may be new to you. Unlike most baking, the recipe is not exact--more or less flour depends on the conditions (heat and humidity affect dough) and the type of flour dictates the amount. So here's the outline, and you can begin your own process of becoming Empress of the Universe."
*Empress of the Universe is a title she bestowed upon herself years ago. See what I had to live with? ;)

Best Bread in the World:

SHOPPING LIST:
Yeast (1 package or 2.25 tsps)
Sugar or honey
Bread Flour
Salt
Vegetable Oil

LET'S GET COOKING!!
Pre-heat oven to 200

1 tbs. fast-acting yeast (I buy the jar, but you can use 1 pkg.)
3/4 c warm water (baby bath temperature or 110 degrees for you purists)
2 tbs honey or 1 tbs. sugar (the yeast needs something to eat)
*I find sugar gets better results. Who knows?

Whisk these in the bowl of your stand mixer and let sit until bubbly (about 3-5 minutes)

While you're waiting, oil a very large bowl.

Next add 2 more cups warm water, 3 cups bread flour and 1 tbs. salt. Adding salt directly to the yeasty water will kill the yeast, so make sure you add the flour before the salt This is also the point that you can add other ingredients--I will often throw in 1/2 c of dried onions, 1 c grape nuts cereal (yeah, I know, but it's great in bread!), a package of Ranch or Italian dressing mix or chopped jalapenos and cheese. If you want to add cheese to your dough, grate the cheese (about 2 cups) on your cutting board and toss with about 1/4 cup flour so it doesn't stick together before adding it to your mixture.

Mix your dough with a paddle at low speed for one minute, then turn the mixer up to medium and let it whale away for at least two minutes. You want to beat some air into this sucker, and this is where the mixer really excels--I gave up doing this part by hand when my rotator cuff about gave out.
Turn the mixer off, scrape down the bowl and add another 2cups of flour--start mixing on low and move to med/high.

By now your bread is starting to look like something. Change to the dough hook and add another cup of flour. Start low (my mixer likes to fling flour all over the counter like a flower girl (get it?) When the dough cleans the bowl and loses its stickiness, let the mixer knead it for a minute.

Empty the bowl of dough onto a lightly floured board and knead by hand a few times. Form it into a ball, and put it smooth side down into your oiled bowl. Rotate and turn it over so that it's covered with a very light sheen of oil. Place a dinner plate or cookie sheet on top and put in your preheated oven. Turn the oven off. Wait until it doubles--it will take about 45 minutes to an hour.

While you're waiting, oil your bread pans. Oh, and be sure to wash the mixing utensils and bowl right away--bread dough turns into cement if you let it dry.

When your dough is has doubled in size, remove from oven and preheat your oven to 425.
Punch down the dough (just like it sounds), divide it into two pieces and knead each individually into a nice loaf-shaped torpedo. Place in pans, put your pans in the microwave to rise a second time. You don't turn the microwave on! This is a perfect spot to keep the loaves warm with no drafts. Just be sure nobody turns on the unit and starts arcing your pans all over the place.

Your second rise should take about 45 minutes--the dough is ready when it's at least 1 inch above the top of the pan. Put the loaves in your preheated oven and bake for 35 minutes. Remove from the oven, turn out of the pans and cool on wire racks for at least 20 minutes (Mr. Martini cannot obey this rule; the first loaf is always squashed because he slices it while it's hot).

If you like a soft crust, brush with a little butter when it comes out of the oven. We are crunchy crusters here, so no butter necessary.

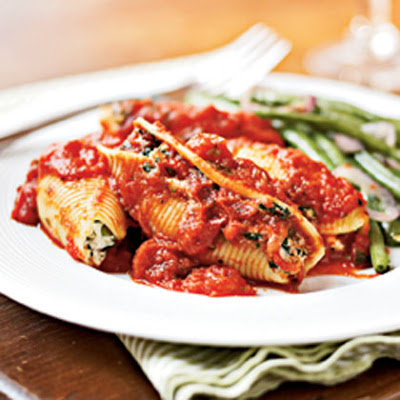
The World's Best Stuffed Shells

stuffed shells, stuffed shell recipe, best stffed shells
Baked Stuffed Shells
Ever since I was a little monkey myself (well before my first martini) my go-to comfort food has been my mom's baled stuffed shells. Something about the gooey goodness of melted cheese wrapped in pasta with soothing red sauce always makes my heart feel a little lighter. Here is a version my mom recently made with my little brother (who is not so little anymore). This version features a yummy sun-dried tomato cream sauce as opposed to your standard tomato gravy.

Shopping list:
1 c (at least) grated mozzarella or asiago cheese
1 container good ricotta cheese (no-fat = not good)
1 c. grated parmesean (fresh)
1 tbs. dried basil or 1/4 cup fresh leaves chopped
1 egg
jumbo shell pasta
1 jar/bag sun-dried tomatoes
head of garlic
1 yellow onion
butter
flour
8oz heavy cream
8oz whole milk

NOW LET'S GET COOKING!!
Preheat your oven to 350

For the filling:
1 container good ricotta cheese (no-fat = not good)
1 c. grated parmesean (fresh)
1 clove garlic, grated
1 tbs. basil
1 egg
Blend these ingredients in a small bowl and allow to marry in the fridge while you prepare the sauce and cook your JUMBO SHELLS according to the package directions.
* You can always add other yummy stuff to your filling: cooked italian sausage or spinach are favs in my house.

Sauce:
Big handful of sun-dried tomatoes (I use dried, you can use the oil-preserved kind if you prefer-just drain them) - reconstituted in 1 c boiling water for about 10 minutes. When they're soft, put them in the food processor, along with 3 cloves of garlic and 1 small onion (chop it beforehand). Pulse those babies until you have a nice emulsion. Add some of the tomato water if necessary to make a nice pasty goo.

In a medium saucepan, melt 2 tbs. butter over medium heat. Stir in about 2 tbs. flour, cooking for a minute or so to make your roux for the cream sauce. Slowly whisk in 1 c heavy cream, 1 c whole milk, your sun-dried tomato mixture and 1 tbs. basil. Keep over medium heat--you don't want the cream sauce to start boiling madly--it will break. When it's thickened, add 1 c (at least) grated parmesean. Stir and allow cheese to melt. Remove from heat. Taste, add stuff you like (pepper flakes and/or garlic, perhaps?)

Drain your shells and slide them into a bowl of slightly warm water--this keeps them from sticking together while you fill them. Shake the water off and fill each shell with about 1 tbs of your ricotta mixture and place in a 13x9 pan (I spray it with cooking spray). Keep stuffing and nestling your shells into the pan. If you have broken shells, fill what you can and tuck the rest of the broken noodles between your stuffed ones. Use all shells--somehow the proportion works out so that you're filling the last of the shells with the last of the ricotta. Another kitchen miracle.

Drizzle your nice, thick sauce over your shells. Cover with 1 c (at least) grated mozzarella or asiago cheese. Spray a sheet of aluminium foil with cooking spray and cover your shells, spray side down. Bake at 350 for 40 minutes--uncover and bake for 20 minutes more. Allow your shells to rest for 10 minutes after you remove them from the oven--they'll tighten a little and make serving much easier.

Share The Crazy!!!